Are the components of your motherboards jumbled up? Because this is what i have been going through lately. With so many ports i am not able to keep the track of each of them neatly and i am terrified that this might damage all the components of my computer. Here I wasn’t able to conclude how to install the IO shield.
As you already know there are a number of components behind your CPU that you have to plug in so the system is able to work. I had no protective shield to safeguard these components and all of them were exposed. After having one of the components damaged for like 3 times i knew that this is the time i need to do something to protect them.
A friend of mine suggested going for installing an IO shield to have these components last longer. I instantly gathered all the tools and purchased a good shield to do so. In this article I will go through every step for how to install an IO shield so you won’t have to suffer.
How To Install IO Shield? 5-Step Guide
Installing IO Shield is one of the most popular and easiest ways to protect your PC from unwanted changes. In this guide, we will explain how you can install IO Shield using the 5-step guide. This will help you to keep your computer safe and secure. Please do follow all the steps carefully to install an IO shield without damaging any of the components.
Step 1: Insert The IO Shield
You need to insert the IO Shield into your PC in such a way that it should be able to cover all the ports on your motherboard. It is recommended that you insert the IO Shield in the back side of your computer.
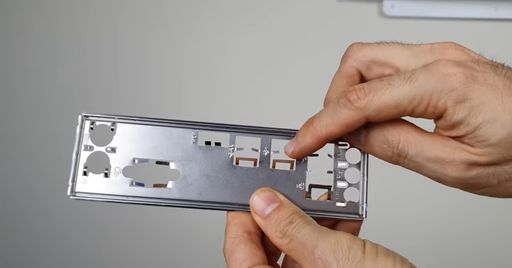
Before doing so make sure to thoroughly check which side of the IO shield needs to go into your CPU case. If you have been Installing IO shield the wrong way you can damage it. For figuring out the direction you need to find out where to install the IO shield or where it will reside over the motherboard.
Once you are clear about which direction to follow you can line the IO shield accordingly to your motherboard. You need to be exact as much as possible. To have an easier hand at installing IO shield it is better to have a mate or two help you out.
Step 2: Adjust the IO Shield
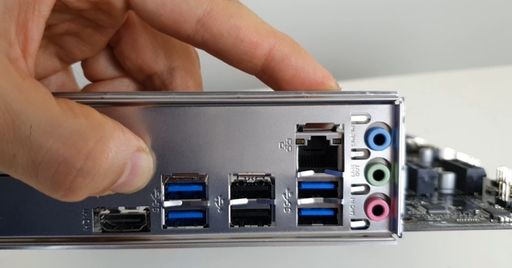
Once you are done with the IO shield installation, you need to check that the IO shield has been placed correctly. Make sure that you have placed it over all the ports of your motherboard.
It is also necessary that you make sure that the IO shield is not covering any of the ports and that there are no gaps between the IO shield and the motherboard. There is a lot of information placed on the IO shield for a swift installation.
You have to notice all the signs carefully to notice these instructions. Around your IO shield you will get to see a lot of rounded bumps. These bumps are most evident at the edges of the shield.
The purpose of these bumps is to protect the IO shield from coming out of the PC case. Thing here is that often vibrations of the PC case can make them fall out. These tiny ridges will help to keep the IO shield in its place without disturbing the setup.
Step 3: Remove Fans
Now that the IO shield has been installed, we can now proceed with the installation of the fans. You need to make sure that you have removed all the fans from your computer. You also need to make sure that you have removed all the fan connectors from the motherboard.
The purpose of this is that when you connect the fans back into their connectors, the connectors may not fit properly. When there are no fans you would be able to have a better look of all the bolts and screws of the IO shield.
Make sure to take a picture of the exhaust fans before removing so you would have an idea about where to install them once the work is done.
Step 4: Install Everything
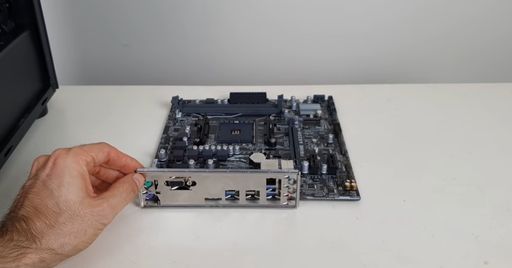
Now is the time you install the IO shield properly. For this purpose you need to place the CPU case horizontally and place the IO shield into its place. Make sure to push softly and not pressurize the IO shield as it would damage and bend it.
After doing so apply a mild pressure to the other end to fit the IO shield into the case perfectly. When you hear a click, it clearly means that the IO shield is secured in its position. Another important thing to remember is to have the bumps on the shield remain above the Case’s metal brace.
The thing is that if you don’t have them in the mentioned position you won’t be able to hear the sound of clicking. Once you have the clicking sound you are all ready to proceed towards the next and last step.
Step 5: Make Sure To Secure Components
Now, you need to verify that everything you have installed is in its place and the shield is secure as well. Notice if all the bumps on the IO shield are out of the metal supports then congratulations the shield has been in its right place.
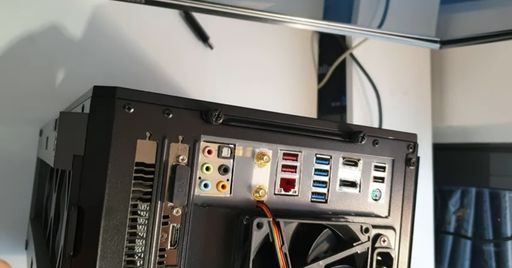
Try shaking it up a bit and see if anything comes out of the case or not. If everything is secure in its place then your shield is all good. Don’t forget to install the exhaust fans back after installing the IO shield. If there are a lot of fingerprints over the IO shield , wipe it off with a microfiber cloth.
Is It Hard To Install IO Shield?
Installing an IO shield over a motherboard might seem the most easiest task but it is not. Even though all the motherboards come up with their own IO shields, the process of installing them is somehow tiring. One thing you need to make sure while installing the IO shield is to not damage any of the components.
Frequently Asked Questions
What Is The Purpose Of An IO Shield?
An IO shield is a component that is used to protect an electronic device from external interference. It is also used to provide a connection between the device and other external devices.
How Much Time It Takes To Install IO Shield?
It typically takes about an hour to install IO Shield. This time usually depends on your skills and level of expertise. If you have done it before you can do so in 30 minutes.
Is It Important To Have IO Shield In Your Motherboard?
IO shields can help to protect the PC components from falling out or getting damaged due to micro level vibrations. They are usually made up of metal that help to prevent any kind of physical damage to the motherboard.
Conclusion
How to install an IO shield is a no-brainer yet it requires a lot of precision. Because the components and the IO shield itself can bend due to impact it is always important to take care of them. Hopefully, now you are good to go to install IO shield. So, you better start working over it!