If you are not able to connect a monitor or LCD to your computer there are chances that the problem lies in the VGA port on the motherboard. Don’t know how to repair the VGA port on the motherboard? Worry not as I am going to spill all the information on how you can get that VGA port back to work ASAP.
Last night I was playing a game with my clan and suddenly the LCD went black. At first, I thought there must be some electric surges and because of this, my system won’t be responding. After connecting another working LCD to my motherboard I found out that the main culprit here is the VGA port.
After being furious for an hour I thought why not have it repaired by myself. So, I instantly grabbed my tools and started to work on it. After working on it for a while the VGA port was back to work. Keep on reading as i am going to teach you how to repair VGA port on motherboard in easy steps.
How To Repair VGA Port On Motherboard?
If your motherboard has a VGA port, you can likely repair it yourself. Remove the motherboard cover and locate the VGA port. If the port is broken, you’ll need to replace the motherboard. If the port is just damaged, you can replace the cable or connector. Below I will be explaining these steps in detail so you can have an easy hand while repairing the VGA port on the motherboard.
Step 1: Preparations
To repair the VGA port, you will need to remove the back cover of the motherboard. Once the back cover is removed, you will need to remove the four screws that hold the motherboard in place. Of course you are going to repair the VGA port on the motherboard.
You need to have it out so you can have a better view of the problem. This way you can also identify if the problem is because of the VGA port on the motherboard or if there is some other problem. Make sure to be careful while performing this step.
Step 2: Remove The Motherboard From The Case
Next, you will need to remove the motherboard from the computer case. The motherboard will need to be placed on a flat surface to allow you to access the VGA port. Also, be cautious as there are a variety of fragile components over a motherboard and a tiny impact can damage them beyond repair.
Ensure that the components are all in good condition and there is no bending or damage over any of the components. Wherever you place the motherboard it must have good lightning. Because in the next step you will be checking the VGA port on the motherboard and a good lightning will help you to do so.
If you are done with everything mentioned in this step you can proceed towards the next one.
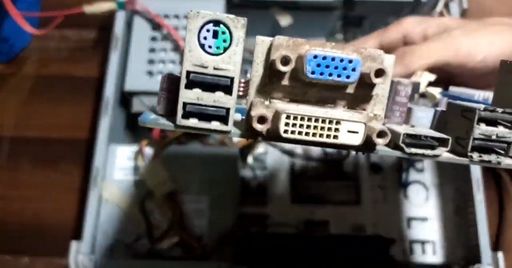
Step 3: Check VGA Port On Motherboard
Once the motherboard is removed, you will need to check the VGA port for any damage. You may also need to disconnect the monitor from the motherboard and reconnect it to ensure that the cable that connects the VGA port to the monitor is not damaged.
In case the cable is damaged or there have been any issues with the wiring then you just have to replace the cable. By doing so the VGA port on the motherboard will be back to work again. If the cable is not damaged, you will need to remove the cable from the VGA port and then reconnect it to the motherboard.
You will need to check the VGA port on the motherboard for any loose connections or damaged pins. This can be done by pressing down on the metal pins on the back of the motherboard. If you notice any loose connections, you will need to use a soldering iron to solder the loose connections.
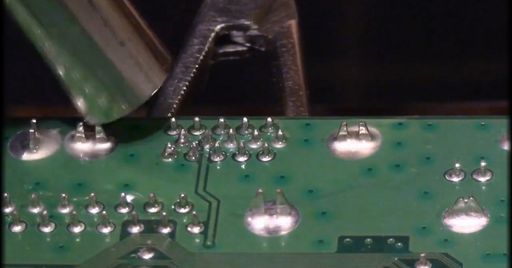
Be careful here as to not injure yourself or damage any of the components around. After having a quick repair make sure to check whether the VGA port on the motherboard is working or not. You can do so by attaching the cable and checking whether the monitor works or not.
Once the loose connections have been repaired, you will need to replace the motherboard into the computer case and then reattach the back cover to the computer case.
Repair Tips
Again, the VGA port on the motherboard can be the most fragile thing ever. A slight damage can render them unfit for working. Because of this reason you need to be way too cautious while handling these components. Here are some tips that I personally followed while learning how to repair a VGA port on a motherboard.
- Make sure that you disconnect the monitor from the motherboard before attempting to repair the VGA port.
- If you are unable to repair the VGA port, you may want to contact the manufacturer for assistance with repairing the port.
- Always inspect the components for damage in a proper light as to check through all thick and thin. Bad lightning will not provide you a complete view of the components.
How To Check VGA Port For Problems?
The first thing you will need to do is determine the problem. If the VGA port is not connecting to the motherboard, it may be because of a bad connection or a bad VGA card. In this case, there is nothing to be done and you will need to replace the VGA card.
If the VGA port is connected but there is no picture displayed on the monitor, the next step is to check the VGA port on the motherboard for a loose connection. If the connection is not loose, the next step is to check the cable that connects the VGA port to the monitor. If the VGA port on the motherboard is connected but the cable is loose, you will need to repair the VGA port.
Conclusion
Hopefully now you know how to repair the VGA port on the motherboard. I will again tell you to be careful while handling the motherboard. Make sure to follow all the steps and tips mentioned here carefully so as to not miss on anything.